XPenology nanoboot-a DSM @ KVM VM - Proxmox

[:en]Installation of XPenology DSM 5.1 in Proxmox (hypervisor KVM) may be a bit tricky, not too scary though.
We need to create a new VM using the button „Create VM” in the right upper corner of the Proxmox window.
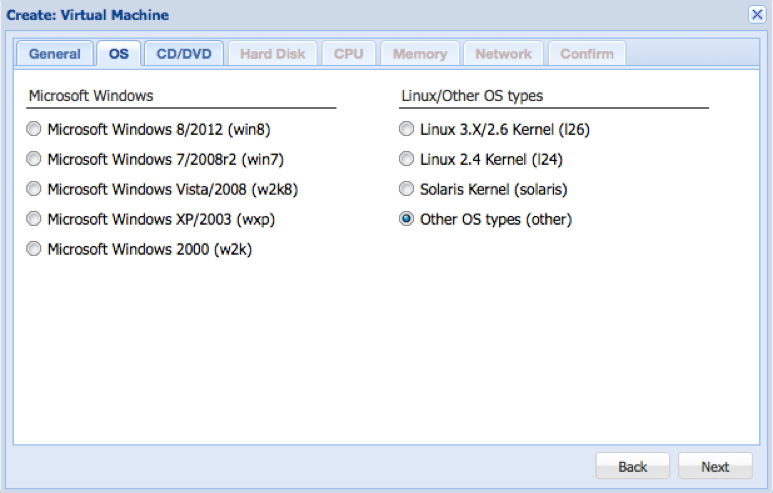
We start creating a new VM by choosing a name for our VM. In the next tab „OS” we will choose „Other OS type”
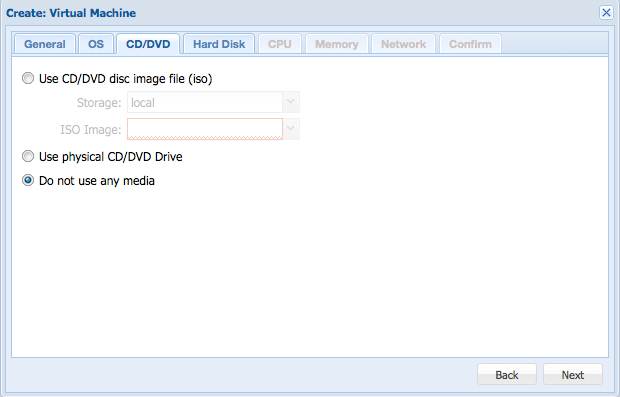
In tab „CD/DVD” we choose not to use any optical drive:
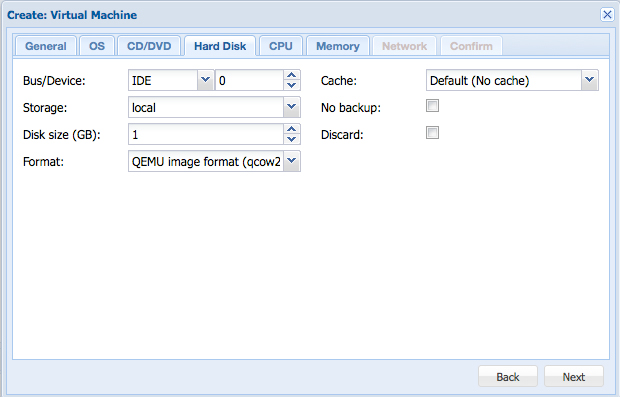
In the tab „Hard Disk” we can decrease the size from default 32 GB to 1GB.
The important thing is to leave bus as IDE and disk format qcow2.
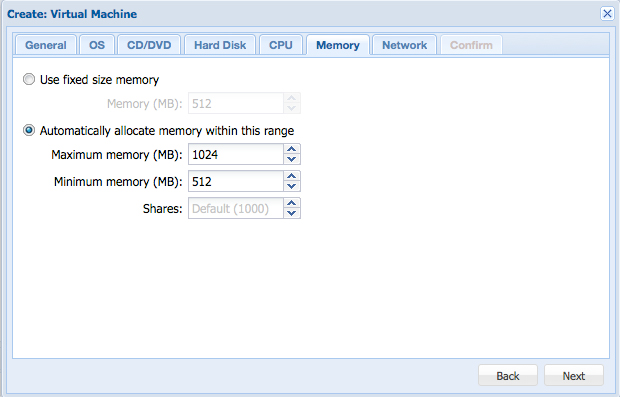
The last tab we would make changes will be „Memory”. Here we would like to change default 512MB to more flexible dynamic range from 512-1024 MB or any other size we prefer depending on the ammount of RAM available in the system.
Please make sure there are IP’s available from you DHCP server. In case you need MAC adress you can get it from the settings of your VM after it has been created.
The creator should create a new VM with the number and the name we chosen. For the purpose of this tutorial we assume the number of VM is 100.
Before we will go any further with DSM it would be wise, to attached additional SATA drive to VM, which will act as regular storage. For myself I have chosen just simple 32GB size to not waste space only for DSM.
To do so we need to login to Proxmox and in the “Hardware” tab of our VM we just click “Add” button and choose appropriate type of hard drive.
Later on we can attach variety of hard drives we could “share” among other VMs we could have in our system to make this system more flexible.
Getting a vmdk image of DSM 5.1
First of all we have to get proper nanoboot image. We need to go to XPEnology project webpage to get vmdk file.
Once we have it we need to use ftp to throw it to /share folder in Proxmox.
Don’t worry there is one created by default /var/lib/vz go ahead and use it to throw the vmdk file in there.
For this tutorial purpose we will rename it as „dsm51.vmdk”
We need to convert vmdk file into qcow2 format.
Converting to qcow2
We want to convert the .vmdk image file to qcow2. To do this, use the following command:
qemu-img convert -f vmdk /var/lib/vz/dsm51.vmdk -O qcow2 /var/lib/vz/images/100/dsm51.qcow2
This can take a while depending on the size of file and speed of your system.
Please note the destination folder is within default /var/lib/vz folder in its /images subfolder and /100 sub-subfolder which is corresponding to the number assigned by the system to our VM.
It happened to me once or twice that vmdk file didn’t work, meaning the DSM booted but installation of the .pat file failed. The curious thing about it was the DSM Installer wanted to format two drives (in my case 2 7). It should ask about formatting only one drive.
Should you receive by any chance this message and then installation failed this is what you have to do.
Go to xpenology.nl website and download iso file, then mount it and then extract to vmdk files. Inside ther should be two files there. XPEnoboot_DS3615xs_5.1-5022.3.vmdk and XPEnoboot_DS3615xs_5.1-5022.3-flat.vmdk or similar.
In this case we need to copy both files to the /var/lib/vz over and without changing their names convert them using in command the file which is without “-flat” in it’s name.
qemu-img convert -f vmdk /var/lib/vz/XPEnoboot_DS3615xs_5.1-5022.3.vmdk -O qcow2 /var/lib/vz/images/100/dsm51.qcow2We should have the outcome in /images/100 pretty soon.
This time DSM Installer should ask to format only one drive (in my case 2)
Then it should work.
Final Steps
Once the conversion is complete, we need to edit the conf file for the VM.
nano /etc/pve/local/qemu-server/100.conf
In the line with ide0: we want to change
vm-100-disk-1.raw,size=32G
to
dsm51.qcow2
We may delete the empty disk created by proxmox when you created the VM.
rm /var/lib/vz/images/100/vm-100-disk-1.raw
Start the VM. Allow some time for nanoboot to kick in.
Using Synology Assistant we should be able now to check our network environment for a new DSM box ready for installation of DSM.
The last thing to do is to point the installer to the image of DSM from XPEnology and finish the installation of DSM as usual.
Happy Days!
Tworzenie nowej VM pod DSM
Instalacja XPenology DSM 5.1 w Proxmoxie (hypervisor KVM) potrafi być podchwytliwa, choć z drugiej strony nie jest też zbyt trudna.
Zaczniemy od staowrzenia nowej maszyny wirtualnej w GUI Proxmoxa, za pomocą przycisku “Create VM”
Pierwszą z opcji w zakłądce “General” będzie wybranie nazwy dla naszej.
W następnej zakłądce (OS) wybieramy opcję “Other OS type (other)” i klikamy Next
W zakładce „CD/DVD” zaznaczamy opcję by nie używać tego rodzaju napędu:
W zakładce „Hard Disk” możemy zmniejszyć rozmiar dysku z 32 GB do 1GB.
Ważne jest, aby zostawić Bus/Device jako IDE a format jako qcow2.
Ostatnia zakładka w jakiej będziemy dokonywać zmian to „Memory”. Tu możemy ustawić ile z RAMu chcemy przypisać dla DSM, możemy też ustawić widełki, żeby system przydzielał RAM dynamicznie.
Pozostałe ustawienia zostawiamy na ustawieniach domyśłnych.
Kreator powinien stworzyć nową maszynę wirtualną z nazwą jaką wybraliśmy oraz numerem. Dla celów tego tutorial przyjmiemy, że numer przyznany dla naszej VM to 100.
Zanim przejdziemy do kolejnych etapów instalacji DSM, byłoby dobrze dodać do naszej VM kolejny dysk, tym razem SATA jako główny storage dla DSM. Bez tego nie zainstalujemy DSM.
W tym celu wystarczy edytować VM, którą stworzyliśmy i dodać kolejny dysk z rozmiarem, jak potrzebujemy.
Pobranie obrazu vmdk DSM 5.1
Żeby zainstalować DSM 5.1 na Proxmoxie potrzebujemy obraz specjalnie przygotowanego pliku nanoboot.
Na pewno je znajdziemy na stronach projektu XPEnology
Potrzebujemy pobrać plik o rozszerzeniu vmdk, który następnie wrzucimy za pomocą ftp do katalogu /share w naszej instalacji Proxmox.
Jeśli jeszcze nie tworzyłeś, żadnych folderów nie przejmuj się gdyż ten folder jest domyślnie stworzony: /var/lib/vz
DLa celów tego tutoriala zmienimy nazwę pliku vmdk na „dsm51.vmdk”
Teraz potrzebujemy przekonwertować format pliku z vmdk do qcow2.
Konwertowanie dysku raw do formatu qcow2
O ile wrzuciliśmy plik o zmienionej nazwie do domyślnego katalog, żeby dokonać konwersji logujemy się do konsoli po ssh I wydajemy komendę:
qemu-img convert -f vmdk /var/lib/vz/dsm51.vmdk -O qcow2 /var/lib/vz/images/100/dsm51.qcow2
Konwersja pliku może potrwać chwilę. Proces ten zależy od wydajności naszego systemu.
Zdarzyło mi się, że używając pliku vmdk system bootował, owszem, ale podczas instalacji DSM instalator chciał formatować dwa dyski zamiast jednego – co już było dziwne, a po przejściu dalej podczas instalacji występował błąd i instalacja kończyła się niepowodzeniem.
W takim przypadku, ze strony projektu XPEnology naleźy pobrać plik nanoboot w postaci iso a następnie zamontować i obydwa pliki ze środka przekopiować do /var/lib/vz.
Pliki powinny nazywać się XPEnoboot_DS3615xs_5.1-5022.3.vmdk i XPEnoboot_DS3615xs_5.1-5022.3-flat.vmdk.
W tym momencie nie będziemy zmieniać nazwy oryginalnego obrazu, ale obraz wynikowy w katalogu /images możemy nazwać jak chcemy, więc plik skonwertujemy komendą:
qemu-img convert -f vmdk /var/lib/vz/XPEnoboot_DS3615xs_5.1-5022.3.vmdk -O qcow2 /var/lib/vz/images/100/dsm51.qcow2
Po tym zabiegu installer DSM powinien proponować formatowanie tylko jednego dysku, co jest poprawnym objawem i instalacja DSM powinna zakończyć się sukcesem.
Kroki końcowe
Kiedy już process konwersji się zakończy musimy edytować plik conf naszej VM.
W tym celu posłużymy się edytorem nano w konsoli:
nano /etc/pve/local/qemu-server/100.conf
Szukamy linii zaczynającej się od ide0: I zmieniamy w niej wartość
:vm-100-disk-1.raw,size=32G
na
dsm51.qcow2
Teraz możemy skasować domyślnie utowrzony przez Proxmox plik dysku podczas tworzenia VM.
rm /var/lib/vz/images/100/vm-100-disk-1.raw
Teraz możemy uruchomić naszą VM. Może chwilę potrawać zanim nanoboot się uruchomi.
Za pomocą Synology Assistant’a wyszukujemy w otoczeniu sieciowych nowo utworzonego xynka. Gdy spróbujemy się z nim połączyć przez przeglądarkę na porcie 5000 powinno nas przywitać okno powitalne instalatora DSM.
W nim nie zapomnijmy ręcznie wgrać pliku pat zawierającego DSM 5.1 I postępujemy zgodnie z instrukacjami pojawiającymi się na ekranie.
To wszystko!